What you’ll learn
- How to add a VI-N track with + VI-N.
- Why VI-N is available only for supported Timelines.
- Why VI-N audio must be mono, single-channel audio.
- How to import the VI-N WAV as DCP PCM MXF.
- How to use SET so the VI-N track changes to ON.
- How to choose Add Audio to VI-N Track.
- How Source TC In, Start Reel, and End Reel control placement.
- How to review VI-N in Audio Config.
- How to export and verify the version.
Workflow overview
- Add the VI-N track with + VI-N.
- Import and convert the mono VI-N WAV file.
- Select the generated MXF in Imported Media.
- Click SET in the VI-N track header so it changes to ON.
- Choose Add Audio to VI-N Track.
- Set Source TC In, Start Reel, and End Reel.
- Confirm, review, export, and verify.
Before you begin
Select the Timeline that should receive the VI-N track and confirm that it matches the picture version used for the VI-N audio.
The VI-N source audio must be mono and contain a single audio channel.
What is VI-N audio?
VI-N stands for Visually Impaired Narrative. It is an accessibility audio track containing descriptive narration for viewers who are blind or visually impaired.
The narration describes important visual information that may not be clear from the dialogue and main soundtrack alone, such as actions, locations, facial expressions, or other significant visual events.
In a DCP, VI-N is carried as a separate mono audio channel rather than being mixed permanently into the MAIN soundtrack.
A compatible cinema accessibility system combines the VI-N channel with the main programme audio for the individual listener.
Show Track Tools
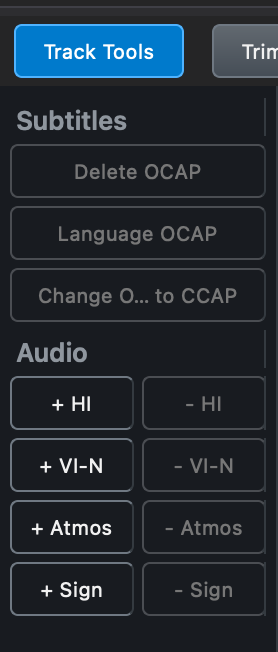
Click the Track Tools button above the Timeline if the panel is hidden.
Add the VI-N track
In the Audio section of Track Tools, click + VI-N.
The button is unavailable when the Timeline already contains a VI-N track or when the active DCP is IOP.
Import the VI-N WAV file
Open the Media tab and choose Import > Import WAV.
The VI-N WAV must be mono with a single audio channel.
Configure the edit rate, SMPTE wrapping, and Mono audio layout. DaCaPo validates the source and converts it to DCP PCM MXF.
Select the imported MXF
Select the generated audio MXF in Imported Media.
Set the VI-N track
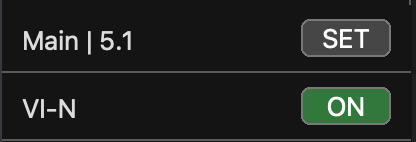
Click SET in the VI-N track header.
The button changes to ON, making VI-N the selected audio track for the next placement operation.
Choose Add Audio to VI-N Track
Right-click the imported audio asset and choose Add Audio to VI-N Track.
DaCaPo opens the placement dialog for the selected VI-N track.
Set the source and reel range
The placement dialog lets you set:
- Source TC In
- Start Reel
- End Reel
Source TC In
Source TC In defines the timecode position in the source audio that should be used at the start of the placement.
Use it when the source VI-N file contains time before the section you want to place. For example, if the required audio starts later in the source file, set Source TC In to that position instead of using the beginning of the file.
Start Reel and End Reel
Start Reel and End Reel define which Timeline reels receive the VI-N audio.
Review the source position and reel range before continuing.
DaCaPo validates the placement
DaCaPo verifies that the selected MXF is compatible with the VI-N track and Timeline before placement.
Add VI-N to the Timeline
Confirm the placement. DaCaPo adds the asset to the VI-N track without affecting the MAIN track.
Monitor the VI-N track
The ON button indicates which audio track is monitored. Only one audio track can be monitored at a time.
Monitoring can be changed while playback is running.
Review Audio Config
Click Audio Config next to the meters button.
The VI-N track appears as a virtual channel together with MAIN audio and any other auxiliary tracks.
Click Done after reviewing the configuration. DaCaPo validates duplicate roles and output-channel conflicts before saving.
Review the VI-N version
- VI-N track presence.
- Start position and reel range.
- Duration and synchronization.
- Monitoring through the VI-N track.
- Audio Config.
- Issues tab.
Export and verify
Export as a VF when compatible picture and MAIN audio can be reused from the OV.
Enable Verify After Export and review the completed package.
Remove the VI-N track
Click - VI-N in Track Tools.
If media is present, DaCaPo asks for confirmation because the Timeline segments will also be removed.
Common problems
+ VI-N is unavailable
The Timeline already contains VI-N, or the active DCP is IOP.
The VI-N WAV is rejected
Confirm that the source audio is mono and contains a single audio channel. Also check the edit rate and SMPTE wrapping used when creating the DCP PCM MXF.
Add Audio to VI-N Track is unavailable
Add the VI-N track, then click SET so it changes to ON.
The audio starts at the wrong position
Check Source TC In. It determines which position in the source audio is used at the start of the placement.
The asset is rejected during placement
Check SMPTE wrapping, edit rate, duration, Source TC In, and reel range.
The wrong track is monitored
Use SET or ON in the VI-N track header.
Audio Config reports a conflict
Resolve duplicate roles or output-channel assignments.